 Action Footage Player
Stabilization
Shaky clips play steady. Nothing to render first.
Shot with the camera's own stabilization off? Double-click the clip, and it plays steady from the motion the camera recorded, while you watch. Stabilizing never changes the original file.
How it works
What it takes to steady a clip.
A shaky clip is the camera turning a little, many times a second. To steady it, each frame is turned back by as much as the camera turned. That takes three things: how the camera moved, how its lens draws the picture, and a program that puts the two together.
How the camera moved
Most action cameras have a gyroscope: a sensor that records, hundreds of times a second, how the camera turned. That's the clip's gyro data, or motion data, written into the video file. It's exact, and reading it takes no time. You get it when the camera's own stabilization is off: what to set is just below.
No gyro data? From the picture
A clip without gyro data can still be steadied: the motion is then found in the picture itself, by following details from frame to frame (optical flow). It's slower, so it's done once, ahead of time, and saved.
How the lens draws the picture
An action camera's wide lens bends the picture, more toward the edges. To turn a frame back the right way, the program needs that lens's shape: its profile. Then straight lines stay straight instead of wobbling at the edges.
The program: Gyroflow
The program that does it here is Gyroflow, free and open source. Its engine runs inside the player while the clip plays, so there's nothing to render first. It knows the lenses of most action cameras. Gyroflow is also an app of its own, for the clips that need more: the player opens a clip in it with Ctrl+e, and plays what you save there.
Before you shoot
What to set on the camera.
The camera records gyro data only in some modes, and the player uses it only when the camera says its own stabilization was off.
-
Turn the camera's own stabilization off
EIS (electronic image stabilization) on DJI, HyperSmooth on GoPro, FlowState in the camera on Insta360. On DJI, it has to be EIS off itself: a horizon mode, or EIS off with a crop, counts as on.
-
On DJI, shoot in the Wide FOV
DJI cameras record the gyro data with EIS off and the Wide field of view. In other FOVs they may record none, and those clips need Gyroflow's optical flow.
-
Under water, keep it off. Above water, your choice
In air, DJI's EIS works well, so there's little reason to turn it off there. Under water it doesn't, as of today's firmware, likely because water bends light and the lens then behaves like a longer one than EIS is tuned for. The preset that comes with the player is made for water. For more on dives, see Under water.
-
Then double-click a clip
Nothing else to set. Log or not doesn't matter here: color is a separate step, explained in Log footage.
Checked on real clips: DJI Osmo Action 6 with EIS off and GoPro HERO12 Black with HyperSmooth off, on a Mac with Apple Silicon. Other DJI cameras, other GoPros and single-lens Insta360 cameras are built for and should work.
Gyroflow projects
Open it in Gyroflow. Save. It's back, stabilized.
Ctrl+e pauses the clip and opens it in Gyroflow, the app, for anything the player's settings don't do. Gyroflow has to be installed.
A clip steadied from its gyro data
The player first writes a project next to the clip, as it plays: the same preset, level, view, horizon lock and lens, and the motion data, so Gyroflow doesn't read it again. A .gyroflow that's already there is opened as it is, never overwritten.
A clip with a project
Its project opens in Gyroflow as it is.
No gyro data? No problem
The video itself opens in Gyroflow, which stabilizes it optically: it finds the motion in the picture itself (optical flow). The panel shows “Waiting for the project from Gyroflow…”. Save the project next to the clip, and the clip loads again where it was, stabilized.
On Windows, opening a video that has no project needs Gyroflow's path in gyroflow_app= in gyroflow.conf.
Each save comes back
Each time you save in Gyroflow (Cmd+SCtrl+S), the player reloads the stabilization at the same spot in the clip. From then on the clip plays with its project.
The video file itself is never written to: the project is always the .gyroflow file beside it.
The Stabilization part
The settings, in the panel beside the video.
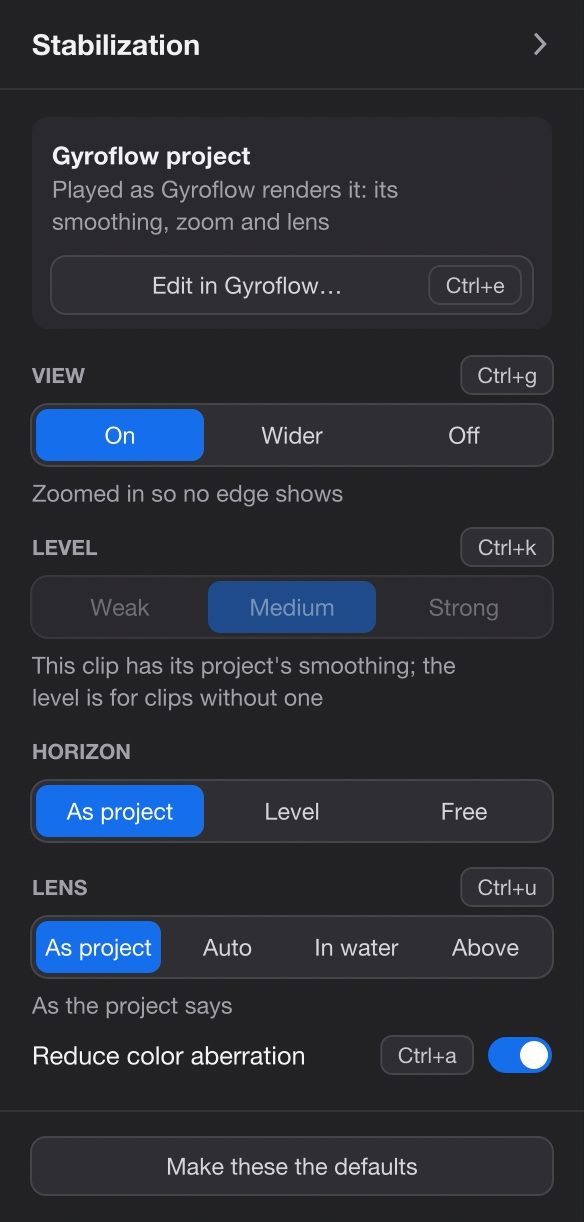
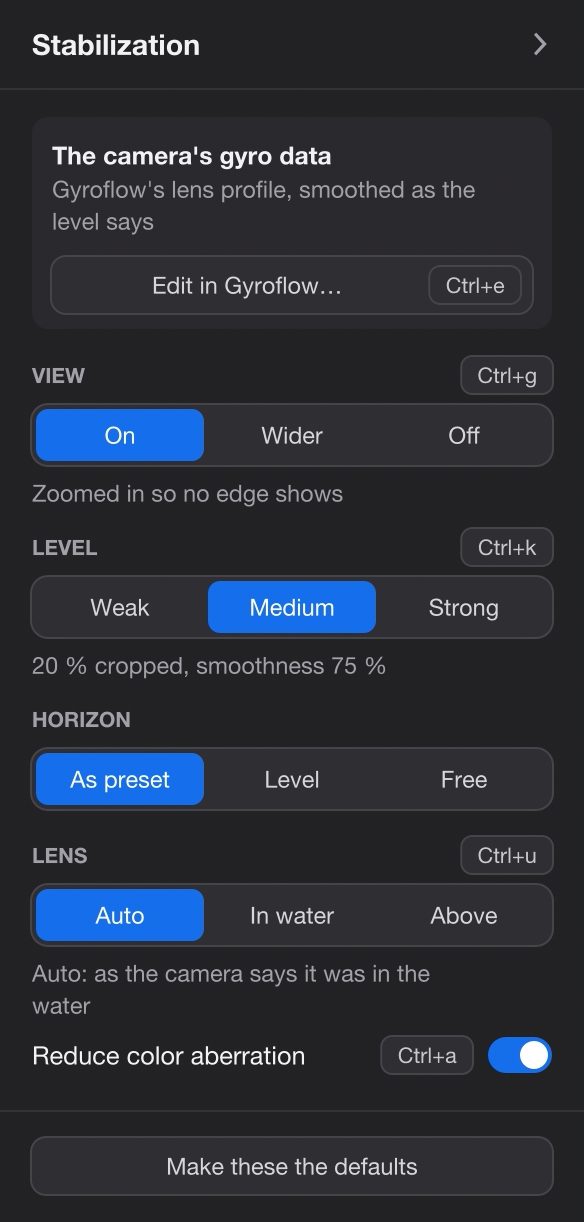
The side panel opens on its Stabilization part. Tab hides the panel and shows it again. From top to bottom:
- What it's stabilized with
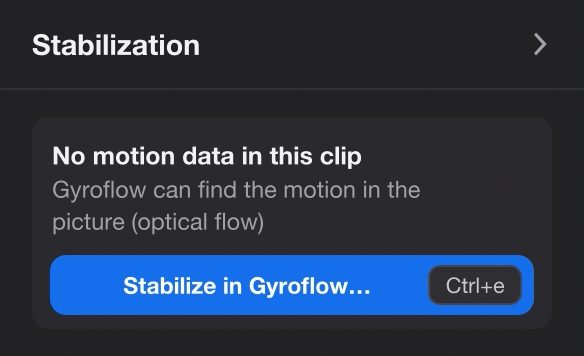
- A card at the top says which case the clip is: “The camera's gyro data”, “Gyroflow project”, or “No motion data in this clip”. Below it, Edit in Gyroflow…, or Stabilize in Gyroflow… when there's no gyro data (Ctrl+e, above). Without gyro data the rest of the part is hidden.
- View default On Ctrl+g
- On: zoomed in so no edge shows. Wider: no zoom, so you see more of the picture and the edges show at times, filled as Edges says. Off: as recorded, for this clip only.
- Level default Medium Ctrl+k
- How strongly, for a clip without a project. Weak: 10 % cropped, smoothness 50 %. Medium: 20 % cropped, smoothness 75 %. Strong: 30 % cropped, smoothness 100 %. When the camera turns further than the crop has room for, the picture follows it sooner, so edges show only then. Switching level takes effect at once, while the clip plays. Greyed for a clip with a project: it has the project's smoothing.
- Horizon default As preset
- As preset (As project for a clip with one): as it says. The preset that comes with the player leaves the horizon free. Level: the horizon kept level. It needs more zoom, so edges show more. Free: not kept level.
- Lens default Auto Ctrl+u
- The correction for how water bends light. Auto: as the camera says it was in the water, switching over one frame when a clip goes in or out. Only the Osmo Action 6 records that; for other cameras Auto is greyed and the clip plays as the preset or project says (the shipped preset: under water). In water and Above set it by hand. A clip with a project has As project first. Ctrl+u switches to Above and back.
- Reduce color aberration default on Ctrl+a
- Under water, the flat glass in front of the lens splits colors apart towards the frame's edges. This puts them back, wherever the lens is under water. On Osmo Action 6 dive clips, red's fringe at the edge goes from 3-7 px to about 1 px. Playback only: exports keep the fringes. Greyed with Lens on Above.
- Make these the defaults
- At the bottom of the part: saves the settings as they are for the next time you start the player.
How long a setting lasts
A setting you change sticks for the rest of the session, for the next clips too, unless you press Make these the defaults, which keeps it for the next start. A clip with a project starts with the project's own settings; what you change there is for that clip only.
| Setting | Clip without a project | Clip with a project |
|---|---|---|
| View | On and Wider stick for the next clips. Off is for this clip only. | Starts On, as Gyroflow has it. Wider or Off: this clip only. |
| Level | Sticks. | Doesn't apply: the project's smoothing. |
| Horizon, Lens | Stick for the next clips without a project. | Start As project. A change: this clip only. |
| Edges, color aberration, temporal denoise | The player's own, not Gyroflow's: they stick for every clip. | |
| Performance & Quality picks | Kept for this computer as soon as you pick them. | |
The preset, and yours
A clip without a project starts from Gyroflow's default preset with the player's own on top. That one is made for under water: the lens corrected for water (refraction 1.33) and the horizon left free. The Level replaces its smoothing and zoom. On a test clip, the correction for water took the leftover jitter between frames from 0.16 px to 0.02 px.
To start from your own, save a preset from Gyroflow (Export → Create settings preset) as default.gyroflow in ~/Library/Application Support/ActionFootagePlayer/gyroflow/%LOCALAPPDATA%\ActionFootagePlayer\gyroflow\. The panel's settings still go on top of it.
What goes into an export
Shift+E exports the clip as it plays: the same project or preset, Level, View, Horizon, Lens and edge fill. Color-aberration removal and denoise are playback only. Exporting, and where the file goes, is on Log footage.
Edges
When the steadied frame doesn't cover the window.
In the Wider view, or when the camera turns further than the crop allows, parts of the window are empty. The player fills them, blurred and blended into the picture.
- Trail by direction default
- What was last seen in that direction, known from the gyro data, taken from the whole frame the camera recorded, including what the zoom crops away. It stays put as the camera pans. Where nothing was seen yet, the colors around spread in, a little darker and greyer.
- Frame's edge spread out
- Only the current frame's own colors, spread out from its edge. Nothing from earlier frames, so nothing that can be off, and the lightest for the computer.
- Background color
- The project's background color, as Gyroflow renders it.

Ctrl+b switches between them while the clip plays. They're in the panel's Performance & Quality part, below. The Wider view picks a field of view where the steadied picture covers about as much area as the frame, so it shows more of the scene, with edges throughout.
The trail knows only how the camera turned, not how it moved. Near things the camera passed, and things that moved by themselves, can be off in it. Where nothing was seen, the fill is made-up color, not picture.
Performance & Quality
For a computer that doesn't keep up.
The panel's Performance & Quality part shows for a clip that's stabilized. Its picks are kept for this computer as soon as you make them.
- Frame rate default Every frame
- Every frame, 30 fps or 15 fps: how often the steadied frame is rendered. A faster clip plays at that rate.
- Size default Display
- Video: the video's own size. Display: no bigger than the screen shows it. 1080p or 720p: at most that.
- Paused frame default As it played Ctrl+f
- Full size: rendered again at the video's own size a moment after pausing. Ctrl+f does it once. More in Photos.
- Temporal denoise default on Ctrl+p
- The paused frame rebuilt from the 5 frames on each side of it, so the sensor's noise from dim light mostly goes. Needs the stabilization on. More in Photos.
- Edges default Trail by direction Ctrl+b
- Trail by direction, Frame's edge spread out, Background color: see Edges.
- Edge fill rate default Auto
- How many frames the trail is written from: Auto, whenever the graphics chip (GPU) has room, or 50 % or 25 % of the frames. For laptops where the processor and the GPU share their power. Only for Trail by direction.
- More
- Reduce color aberration: the same switch as in the Stabilization part. Pause and ask when slow (on): see below.
When it can't keep up, it asks
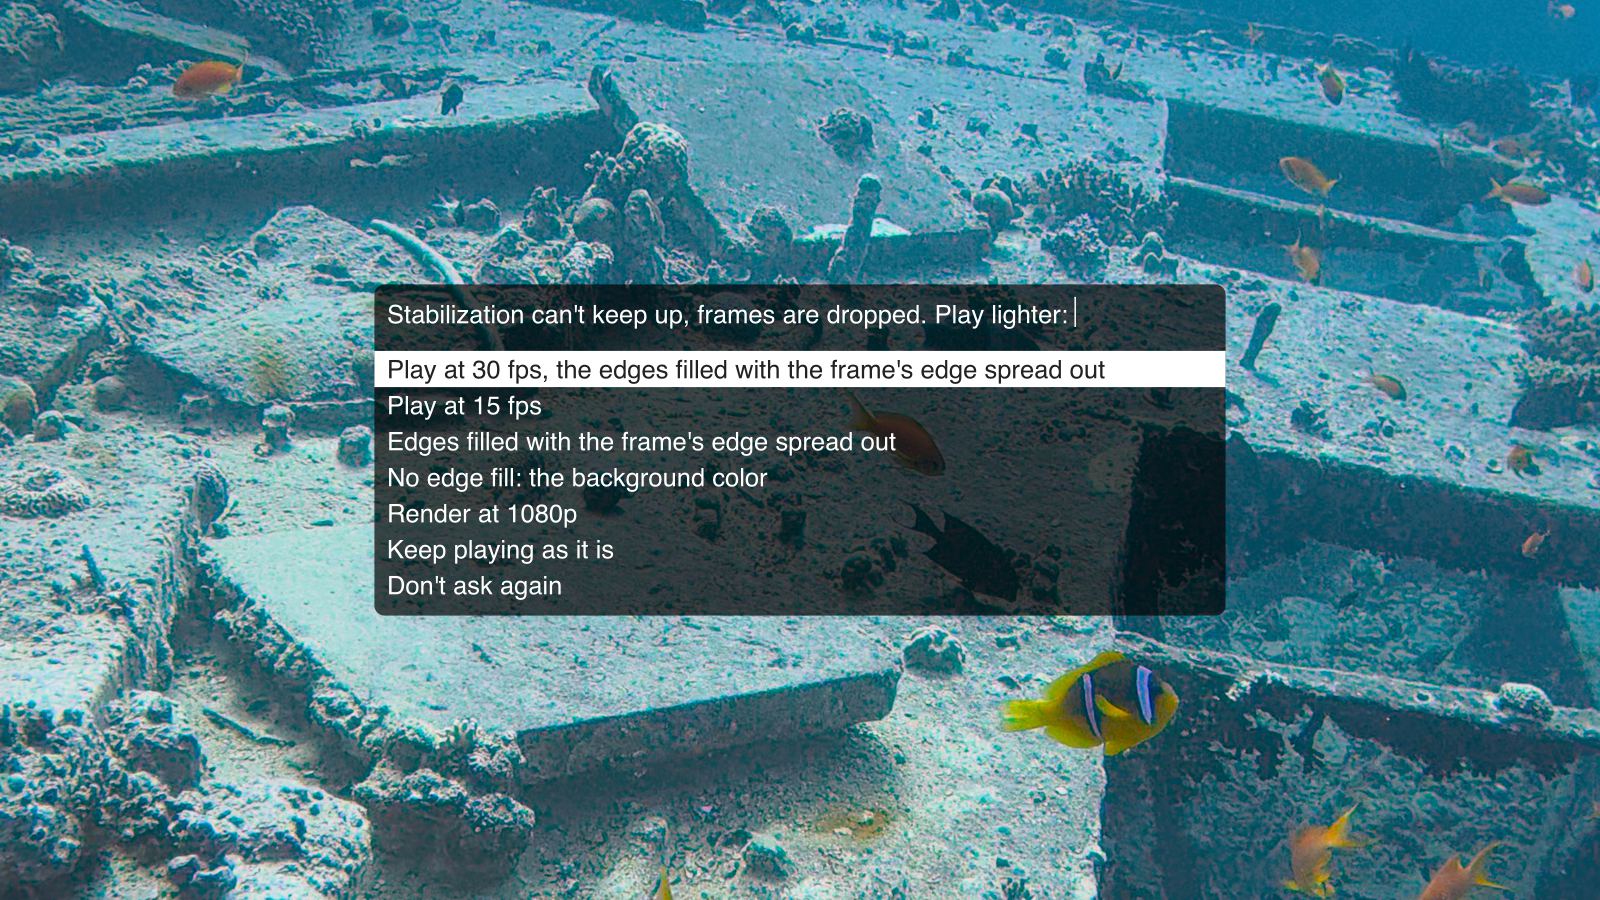
If more than a tenth of the frames are dropped for over 2 seconds, playback pauses and asks: “Stabilization can't keep up, frames are dropped. Play lighter:”. It offers what helps on that clip: 30 or 15 fps, a lighter edge fill, no edge fill, rendering at 1080p, leaving the color fringes, or playing on as it is, and “Don't ask again”. What you pick is kept.
On an M1 Pro MacBook Pro, the stabilization keeps up with 4K at 60 fps with room to spare. On a thin 15 W Windows laptop, 4K at 60 fps with the trail kept up at 15 fps, not at 30.
Moments
A moment keeps the stabilization it was saved with.
A moment is a part of a clip you keep (k). It saves one of two things, never both. If the clip had a Gyroflow project, the moment gets its own trimmed copy, _Moments/<name>.gyroflow, which then decides its horizon, crop and smoothing. Otherwise it keeps the View, Level and Horizon it was made with, over the preset. A later change to the clip or to its project doesn't reach the moment.
While a moment plays, the panel's Stabilized row offers As saved, On its own (smoothed from the moment's own motion only) and With its clip (smoothed with the clip's motion around it). Every setting starts at As saved. What you choose is for viewing only, for every moment this session, until Keep in <name> writes it into the moment.
How it decides
Three questions, in this order, each time a clip opens.
The player never guesses. It stabilizes a clip only when it knows how, and otherwise plays it as it was recorded.
-
A Gyroflow project next to the clip wins
A Gyroflow project is a small
.gyroflowfile with everything Gyroflow needs to steady one clip. The player looks for one beside the video with the same name:DJI_0007_D.gyrofloworDJI_0007_D.MP4.gyroflow. If it finds one, the clip plays as Gyroflow renders it: the project's smoothing, zoom, lens, output size, horizon lock and correction for water. The player's Level doesn't apply. -
Else, the camera's gyro data, if the camera's stabilization was off
Before the clip plays, the player reads what the camera wrote into the file. It steadies the clip only when the file has gyro data and the camera recorded that its own stabilization was off: EIS off on DJI (and the Wide FOV, the field of view), HyperSmooth off on GoPro, FlowState off on Insta360. GoPro and Insta360 clips also need their lens in Gyroflow's lens database. The clip then plays with the preset that comes with the player and your settings in the panel: Level, View, Horizon and Lens.
-
Else, no gyro data? No problem: Ctrl+e opens it in Gyroflow
Until then the clip plays as it was recorded. Press Ctrl+e, and the video opens in Gyroflow, which stabilizes it optically, from the motion in the picture itself (optical flow). Save the project there, next to the clip, and the clip loads again where it was, stabilized: it's now a clip with a project, case 1.
Why so strict: footage the camera has already steadied gets worse when it's stabilized a second time. So a clip whose camera says its stabilization was on, or doesn't say, plays as recorded. A wrong guess about a camera means its clips play as they are, not worse.
Keys
The keys.
Ctrl is Ctrl on a Mac too, not Cmd.
Limits
What it doesn't do.
- No gyro data? Gyroflow stabilizes it optically. A DJI clip shot with EIS on, or in another FOV than Wide, may have none. Ctrl+e opens it in Gyroflow; save the project there, and it plays steady here.
- Camera stabilization on means as recorded, GoPro HyperSmooth and Insta360 FlowState included, even though those cameras record gyro data anyway.
- The panel says “No motion data in this clip” for any clip it doesn't stabilize, also a GoPro clip with HyperSmooth on that has gyro data. Gyroflow may then use that gyro data rather than optical flow.
- Checked on two cameras: the Osmo Action 6 and the GoPro HERO12 Black. GoPro and Insta360 clips need their lens in Gyroflow's lens database.
- A project made with Ctrl+e smooths a little differently in Gyroflow than the Level does in the player.
- After a jump past what's been read, a clip without a project plays uncorrected for a moment (about 2 s from a network drive), then the correction fades in.
- Color-aberration removal and denoise are playback only, not in exports.
- While a clip plays, an export nearly stops. Pause to let it run.
- Only files on a drive are stabilized, not streams from a web address.
- The Windows app is an alpha, with little testing so far.
Questions
About stabilization.
Why does my clip still play shaky?
Most often the camera's own stabilization was on, or, on DJI, the clip wasn't shot in the Wide FOV, so there's no gyro data to use. The panel's card says “No motion data in this clip”. Press Ctrl+e to stabilize it in Gyroflow; once the project is saved next to the clip, it plays steady here.
Should I turn the camera's stabilization off above water too?
Not necessarily. In air, DJI's EIS works well. Under water it doesn't, and that's where turning it off pays. For a clip shot in air with EIS off on a camera other than the Osmo Action 6, set Lens to Above (Ctrl+u): the shipped preset assumes water.
Do I need Gyroflow?
Not for clips with gyro data and the camera's stabilization off: the player steadies them on its own. You need the Gyroflow app to make or change a project, and for clips without gyro data.
Does it change my video files?
No. The player only reads them. A project is a separate .gyroflow file next to the clip, and the player never overwrites one that's there.
Try it
Turn the camera's stabilization off. Double-click the clip.
Free, no account, and your footage stays as it is.
Diving?
The defaults are made for water: the correction for it, the color fringes, the depth on screen.
Under waterSend a clip from your camera
A few seconds straight from the card help move a camera from “should work” to checked.
Open an issue on GitHub